Goal
Create workflow step to crop images. The cropped image is saved as payload image rendition. Check Demo Video, Source code and Package Install
Solution
For creating workflow, we use the Dialog Participant Step and configure dialog with a CQ.html5.form.SmartImage widget. User selects crop co-ordinates; the next automated step in workflow reads crop numbers, crops the image and saves it as logo.png renditioon
Create Wokflow Step
1) Create and deploy workflow step ImageCropStep as OSGI bundle, to read crop co-ordinates and crop the image ( Read this post on how to create an OSGI component )
package apps.mysample.imagecrop;

import com.day.cq.commons.ImageHelper;
import com.day.cq.dam.api.Asset;
import com.day.cq.dam.commons.util.DamUtil;
import com.day.cq.workflow.WorkflowException;
import com.day.cq.workflow.WorkflowSession;
import com.day.cq.workflow.exec.WorkItem;
import com.day.cq.workflow.exec.WorkflowProcess;
import com.day.cq.workflow.metadata.MetaDataMap;
import com.day.image.Layer;
import org.apache.commons.io.FileUtils;
import org.apache.commons.io.IOUtils;
import org.apache.commons.lang3.StringUtils;
import org.apache.felix.scr.annotations.*;
import org.apache.felix.scr.annotations.Component;
import org.apache.felix.scr.annotations.Property;
import org.apache.sling.api.resource.Resource;
import org.apache.sling.api.resource.ValueMap;
import org.apache.sling.jcr.resource.JcrResourceResolverFactory;
import org.slf4j.Logger;
import org.slf4j.LoggerFactory;

import javax.jcr.*;
import java.awt.*;
import java.io.File;
import java.io.InputStream;
import java.io.OutputStream;

@Component(metatype = true)
@Service
@Property(name = "process.label", value = "Crop Image In Inbox")
public class ImageCropStep implements WorkflowProcess {
    private static final Logger log = LoggerFactory.getLogger(ImageCropStep.class);

    @Reference(policy = ReferencePolicy.STATIC)
    private JcrResourceResolverFactory factory;


    @Override
    public void execute(WorkItem item, WorkflowSession session, MetaDataMap metaData)
                            throws WorkflowException {
        try{
            createCroppedRendition(item, session);
        }catch(Exception e){
            log.error("error generating cropped rendition", e);
            throw new WorkflowException("Crop failed", e);
        }
    }

    private void createCroppedRendition(WorkItem item, WorkflowSession session) throws Exception {
        Resource resource = getResourceFromPayload(item, session.getSession());
        Resource dataResource = resource.getChild("jcr:content/renditions/original/jcr:content");

        ValueMap map = resource.getChild("jcr:content").adaptTo(ValueMap.class);
        String cords = map.get("imageCrop", String.class);

        if(StringUtils.isEmpty(cords)){
            log.warn("crop co-ordinates missing in jcr:content for: " + resource.getPath());
            return;
        }

        Layer layer = ImageHelper.createLayer(dataResource);
        Rectangle rect = ImageHelper.getCropRect(cords, resource.getPath());

        layer.crop(rect);

        OutputStream out = null;
        InputStream in = null;
        String mimeType = "image/png";

        try {
            File file = File.createTempFile("cropped", ".tmp");
            out = FileUtils.openOutputStream(file);

            layer.write(mimeType, 1.0, out);
            IOUtils.closeQuietly(out);

            in = FileUtils.openInputStream(file);
            Asset asset = DamUtil.resolveToAsset(resource);

            asset.addRendition("logo.png", in, mimeType);
            session.getSession().save();
        } finally {
            IOUtils.closeQuietly(in);
            IOUtils.closeQuietly(out);
        }
    }

    private Resource getResourceFromPayload(WorkItem item, Session session) {
        if (!item.getWorkflowData().getPayloadType().equals("JCR_PATH")) {
            return null;
        }

        String path = item.getWorkflowData().getPayload().toString();
        return factory.getResourceResolver(session).getResource(path);
    }
}
2) Login to CRXDE Lite, create folders /apps/imagecropstep, /apps/imagecropstep/install
3) Deploy bundle with ImageCropStep to /apps/imagecropstep/install
Create Dialog Image Widget
1) Create node /apps/imagecropstep/editor of type sling:Folder
2) Create node /apps/imagecropstep/editor/clientlib of type cq:ClientLibraryFolder and add property categories with String value cq.widgets
3) Create node /apps/imagecropstep/editor/clientlib/js.txt of type nt:file and add
SmartImage.js
4) Create node /apps/imagecropstep/editor/clientlib/SmartImage.js of type nt:file and add the following code
CQ.Ext.ns("MyClientLib");

CQ.Ext.override(CQ.form.SmartImage.ImagePanel, {
    addCanvasClass: function(clazz) {
        var imageCanvas = CQ.Ext.get(this.imageCanvas);

        if(imageCanvas){
            imageCanvas.addClass(clazz);
        }
    },

    removeCanvasClass: function(clazz) {
        var imageCanvas = CQ.Ext.get(this.imageCanvas);

        if(imageCanvas){
            imageCanvas.removeClass(clazz);
        }
    }
});

MyClientLib.InboxSmartImage = CQ.Ext.extend(CQ.html5.form.SmartImage, {
    Record:  CQ.data.SlingRecord.create([]),

    constructor: function(config) {
        config = config || {};
        config.fileReferenceParameter = "imageReference";
        config.name = "placeHolder";
        MyClientLib.InboxSmartImage.superclass.constructor.call(this,config);
    },

    clearInvalid: function() {
        if(!this.uploadPanel || !this.uploadPanel.body) {
            return;
        }

        MyClientLib.InboxSmartImage.superclass.clearInvalid.call(this);
    },

    afterRender: function() {
        MyClientLib.InboxSmartImage.superclass.afterRender.call(this);

        var dialog = this.findParentByType('dialog');
        dialog.setSize(900,550);

        var imageAdded = false;

        dialog.on('afterlayout', function(){
            if(!imageAdded){
                var rec = new this.Record({},{});

                var inbox = CQ.Ext.getCmp(CQ.workflow.Inbox.List.ID);
                var imagePath = inbox.getSelectionModel().getSelections()[0];
                imagePath = imagePath.data.payloadPath;

                rec.data["imageReference"] = imagePath;
                this.processRecord(rec);

                imageAdded = true;
            }
        },this);
    }
});

CQ.Ext.reg('inboxsmartimage', MyClientLib.InboxSmartImage);
5) In the above step we are extending html5smartimage, registering it as inboxsmartimage, with necessary changes to load image available in the workflow payload ( Line 51-53 )
6) Create node /apps/imagecropstep/editor/dialog of type cq:Dialog and add the following xml chunk
<?xml version="1.0" encoding="UTF-8"?>
<jcr:root xmlns:cq="http://www.day.com/jcr/cq/1.0" xmlns:jcr="http://www.jcp.org/jcr/1.0"
    jcr:primaryType="cq:Dialog"
    title="Image Dialog"
    xtype="dialog">
    <items jcr:primaryType="cq:WidgetCollection">
        <image
            jcr:primaryType="cq:Widget"
            cropParameter="./jcr:content/imageCrop"
            fieldLabel="Image"
            height="250"
            xtype="inboxsmartimage"/>
    </items>
</jcr:root>
Create Worflow
1) Access Workflow console (http://localhost:4502/libs/cq/workflow/content/console.html)
2) In Models tab click New and add title Inbox Crop
3) Double click Inbox Crop to open the workflow in a new tab ( http://localhost:4502/cf#/etc/workflow/models/inbox-crop.html ). Here is how it looks initially
4) Delete Step 1
5) From the SideKick -> Components tab -> Workflow, drag and drop the step Dialog Participant Step
6) Double click to open the step and add
Common tab -> Title: Select Crop Coordinates
Common tab -> Description: In this step the user selects crop co-ordinates saved under jcr:content of payload image in dam
User/Group tab -> User/Group: /home/groups/a/administrators
Dialog tab -> Dialog path: /apps/imagecropstep/editor/dialog
7) Dialog path /apps/imagecropstep/editor/dialog is the dialog created in Step 6 of above section Create Dialog Image Widget
8) From the SideKick -> Components tab -> Workflow, drag and drop the step Process Step
9) Double click to open it and add
Common tab -> Title: Crop Image
Common tab -> Description: This automated step crops the image, reading crop coordinates from ./jcr:content/imageCrop and creates rendition /jcr:content/renditions/logo.png
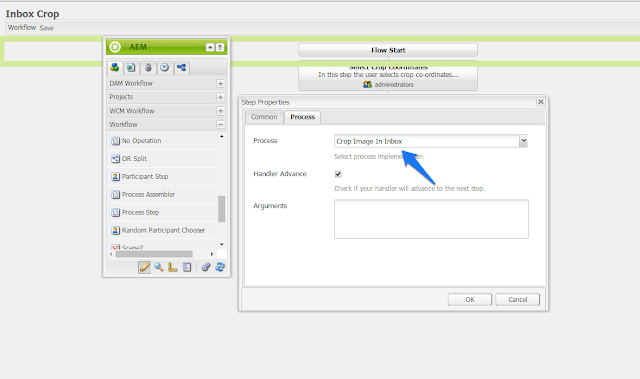
Process tab -> Process: Select Crop Image In Inbox
Handler Advance: Check
10) The Process selected in Process tab above was deployed as OSGI bundle in section Create Wokflow Step above
11) Important, save the workflow
Start workflow on an Image
1) Access DAM admin console (http://localhost:4502/damadmin) and upload an image, say /Mine/Desert.jpg
2) Rightclick on Desert.jpg and click Workflow
3) Select Inbox Crop for Workflow, enter comment Complete this workflow step to crop image
4) Click Start
5) Access Inbox console (http://localhost:4502/inbox) and you should see the step Select Crop Coordinates
6) Rightclick on the step and select Complete
7) You should see the image ready for cropping, do the crop
8) Click Ok, step should complete, browse CRXDE Lite (http://localhost:4502/crx/de) /content/dam/Mine/Desert.jpg/jcr:content and you should see the crop co-ordinates with property imageCrop
9) The Crop Image in Inbox automated step should have created the cropped image as rendition /content/dam/Mine/Desert.jpg/jcr:content/renditions/logo.png
10) Access the cropped image to check if it is ok http://localhost:4502/content/dam/Mine/Desert.jpg/jcr:content/renditions/logo.png


No comments:
Post a Comment