Goal
This post is on configuring AEM in DMS7 (Dynamic Media Scene 7 mode), a cover to cover step-by-step guide with details on getting your AEM up and running with DMS7 for uploading, encoding, rendering videos in author, publish pages created using Static HTL Templates.
Additionally, extend the video player to add a text overlay using the s7sdk api
For more details on DMS7 check this post (details pertaining to DMS7 only and not other configuration types like Hybrid)
Demo | Package Install | Github
Solution
Configuring Dynamic Media Scene7
1) As always, everything starts with an email. If you are provisioned for DM Scene7, you must have received an email with the credentials necessary for configuring AEM with DMS7, something like below (make sure you change the password, for safety reasons and also to get the connection to Scene7 from AEM works)
2) Start AEM with dynamicmedia_scene7 run mode
java -Xdebug -Xrunjdwp:transport=dt_socket,address=5005,suspend=n,server=y
     -XX:MaxPermSize=512m -Xmx1024M -Doak.queryLimitInMemory=500000 -Doak.queryLimitReads=500000
     -jar cq-quickstart-6.4.0-p4502.jar -r dynamicmedia_scene7 -nofork
3) Goto Tools -> Cloud Services -> Dynamic Media Configuration (tip - use omnisearch) and in the /conf/global folder, create a configuration for connecting to Scene7; make sure the connection works and add Company Root Folder Path (all folders in /content/dam with valid video profiles are synced as sub-folders of root folder in Scene7)
http://localhost:4502/libs/dam/content/configurations/dmscene7.html/conf
4) To securely preview Dynamic Media content before it gets published, you will need to whitelist the AEM author instance to connect to Dynamic Media. Log on to your Dynamic Media Classic account: http://www.adobe.com/marketing-cloud/experience-manager/scene7-login.html, Setup > Application Setup > Publish Setup > Image Server add your AEM author IP. Scene7 setup for secure preview is explained in this documentation
5) With a successful configuration, AEM Assets creates hidden system folders (property hidden = true) /content/dam/_CSS, /content/dam/_DMSAMPLE for storing viewer specific css and images. At this point let error.log stabilize a bit (AEM Scene7 sync under the hood).
Check the status of AEM- Scene7 sync http://localhost:4502/libs/dam/gui/content/s7dam/samplemanager/samplemanager.html
6) Create a sample folder for uploading videos, make sure this folder has a video profile associated eg. Adaptive Video Encoding, there is no default. Video profiles are available in Tools -> Assets -> Video Profiles http://localhost:4502/mnt/overlay/dam/gui/content/s7dam/videoprofiles/videoprofiles.html
7) Upload a video to play in sample site page and later publish, the encoding progress is shown (under the covers, video is synced to Scene7 and the renditions, thumbnails are dynamically pulled from Scene7, shown in AEM)
Playing Video in Site Pages
1) Login to CRXDe Lite and create a static HTL or JSP template. Package Install has necessary code for sample page component (extending core components)
/apps/eaem-basic-htl-page-template
2) Create a test page, open and enter Design mode, enable Dynamic Media components in ParSys configuration (stored in /libs/settings/wcm/designs/default/jcr:content/basic-htl-page-component/content)
http://localhost:4502/editor.html/content/test.html
3) In the Edit mode drag and drop Dynamic Media -> Dynamic Media component, drag drop the test video and click Settings for configuring the component. Enter width and height, select Viewer Preset (video player settings). Viewer presets are available in Tools -> Assets -> Viewer Presets http://localhost:4502/mnt/overlay/dam/gui/content/s7dam/viewerpresets/viewerpresets.html
4) To extend the Video player UI, you can create a custom viewer preset, but this post is more on exploring the s7sdk api, so for adding a text overlay using javascript register a clientlib based extension /apps/eaem-scene7-video-viewer-text-overlay/clientlib of type cq:ClientLibraryFolder, categories set to [cq.dam.components.scene7.common.viewer] and dependencies set to [jquery, lodash]
5) Create a file /apps/eaem-scene7-video-viewer-text-overlay/clientlib/css.txt with the following text
text-overlay.css
6) Add file /apps/eaem-scene7-video-viewer-text-overlay/clientlib/text-overlay.css with the following style
.eaem-video-text-overlay {
    position: relative;
    top: 60%;
    left: 18%;
    color: #AAA;
    font-size: 30px;
    background-color: #EEE;
    width: 400px;
    padding: 5px;
    text-align: center;
}
7) Create a file /apps/eaem-scene7-video-viewer-text-overlay/clientlib/js.txt with the following text
text-overlay.js
8) Add file /apps/eaem-scene7-video-viewer-text-overlay/clientlib/text-overlay.js with the following code
(function($, $document){
    var COMP_SELECTOR = '.s7dm-dynamic-media',
        EAEM_TEXT_OVERLAY = "eaem-video-text-overlay";

    $document.ready(findViewer);

    function findViewer(){
        $(COMP_SELECTOR).each(function(){
            getViewer($(this).attr('id')).then(handleViewer);
        });
    }

    function handleViewer(viewer){
        if(!viewer instanceof s7viewers.VideoViewer){
            return;
        }

        var s7sdk = window.s7classic.s7sdk;

        viewer.s7params.addEventListener(s7sdk.Event.SDK_READY, function(){
            s7sdkReady(viewer, s7sdk);
        }, false);
    }

    function s7sdkReady(viewer, s7sdk){
        viewer.videoplayer.addEventListener(s7sdk.event.CapabilityStateEvent.NOTF_VIDEO_CAPABILITY_STATE, function(event){
            addTextOverlay(viewer, event.s7event);
        }, false);

        //viewer.playPauseButton.addEventListener("click", function(){});
    }

    function addTextOverlay(viewer, s7event){
        var $vpComponent = $("#" + viewer.videoplayer.compId),
            $textOverlay = $("." + EAEM_TEXT_OVERLAY);

        if(!_.isEmpty($textOverlay)){
            if(s7event && s7event.state && (s7event.state.state == 13)){
                $textOverlay.hide();
            }else{
                $textOverlay.show();
            }
            return;
        }

        $vpComponent.append("<div class='" + EAEM_TEXT_OVERLAY + "'>click anywhere to watch video</div>")
    }

    function getViewer(compId){
        if(!compId){
            return;
        }

        return new Promise(function(resolve, reject){
            var INTERVAL = setInterval(function(){
                var viewer = S7dmUtils[compId];

                if(!viewer || !viewer.initializationComplete){
                    return;
                }

                clearInterval(INTERVAL);

                resolve(viewer);
            }, 100);
        });
    }
}(jQuery, jQuery((document))));
9) Refresh test page and check the player in Published mode http://localhost:4502/content/test.html?wcmmode=disabled
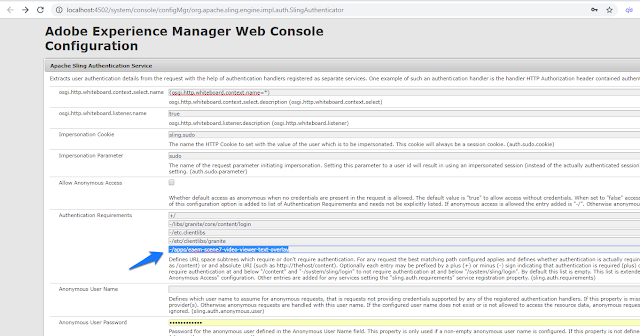
10) Add necessary sling authenticator configuration to access the extension code in unauthenticated envs like publish
http://localhost:4502/system/console/configMgr/org.apache.sling.engine.impl.auth.SlingAuthenticator
11) Start your Publish AEM (dynamicmedia_scene7 runmode is NOT necessary in publish), publish everything, template, page, components, viewer presets etc. and check the video player text overlay - click anywhere to watch video
/apps/eaem-scene7-video-viewer-text-overlay
/apps/eaem-basic-htl-page-template
/apps/system/config/org.apache.sling.engine.impl.auth.SlingAuthenticator.config


No comments:
Post a Comment