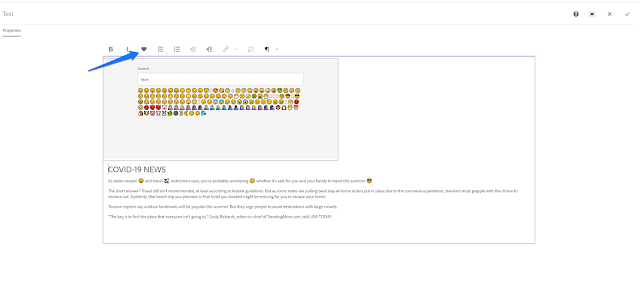
AEM 6540 - Core Components 280 - Touch UI RTE (Rich Text Editor) Dialog Emojis Plugin


Touch UI Emoji Picker Plugin for RTE (Rich Text Editor) Dialog - /libs/cq/gui/components/authoring/dialog/richtext

In Core Components 2.8.0 uiSettings/cui/dialogFullScreen was removed and the plugin settings were moved to Template (Component) Policies, this post is for core components >= 2.8.0 

Uses Open Emoji API https://emoji-api.com/

For demo purposes, design dialog of core text component v2 was modified to add the emoji picker configuration - /apps/core/wcm/components/text/v2/text/cq:design_dialog/content/items/tabs/items/plugins/items/experience-aem-emojis


Emoji Plugin


Plugin Configuration in Design


Enable Plugin in Component Policy


Let's Do It

1) Login to CRXDE Lite, add nt:folder /apps/eaem-emojis-rte-plugin

2) To show the Emoji Picker in a dialog create cq:Page /apps/eaem-emojis-rte-plugin/emoji-selector and add  eaem.rte.emojis.plugin categories in /apps/eaem-emojis-rte-plugin/emoji-selector/jcr:content/head/clientlibs

<?xml version="1.0" encoding="UTF-8"?>
<jcr:root xmlns:sling="http://sling.apache.org/jcr/sling/1.0" xmlns:cq="http://www.day.com/jcr/cq/1.0" xmlns:jcr="http://www.jcp.org/jcr/1.0" xmlns:nt="http://www.jcp.org/jcr/nt/1.0"
    jcr:primaryType="cq:Page">
    <jcr:content
        jcr:mixinTypes="[sling:VanityPath]"
        jcr:primaryType="nt:unstructured"
        jcr:title="EAEM Emoji Selector"
        sling:resourceType="granite/ui/components/coral/foundation/page">
        <head jcr:primaryType="nt:unstructured">
            <favicon
                jcr:primaryType="nt:unstructured"
                sling:resourceType="granite/ui/components/coral/foundation/page/favicon"/>
            <viewport
                jcr:primaryType="nt:unstructured"
                sling:resourceType="granite/ui/components/coral/foundation/admin/page/viewport"/>
            <clientlibs
                jcr:primaryType="nt:unstructured"
                sling:resourceType="granite/ui/components/coral/foundation/includeclientlibs"
                categories="[coralui3,granite.ui.coral.foundation,granite.ui.shell,dam.gui.admin.coral,eaem.rte.emojis.plugin]"/>
        </head>
        <body
            jcr:primaryType="nt:unstructured"
            sling:resourceType="granite/ui/components/coral/foundation/page/body">
            <items jcr:primaryType="nt:unstructured">
                <form
                    jcr:primaryType="nt:unstructured"
                    sling:resourceType="granite/ui/components/coral/foundation/form"
                    class="foundation-form content-container"
                    maximized="{Boolean}true"
                    style="vertical">
                    <items jcr:primaryType="nt:unstructured">
                        <emoji
                            jcr:primaryType="nt:unstructured"
                            jcr:title="Click on the Emoji select.."
                            sling:resourceType="granite/ui/components/coral/foundation/container">
                            <items jcr:primaryType="nt:unstructured">
                                <fixedColumns
                                    jcr:primaryType="nt:unstructured"
                                    sling:resourceType="granite/ui/components/coral/foundation/fixedcolumns"
                                    margin="{Boolean}true">
                                    <items jcr:primaryType="nt:unstructured">
                                        <column
                                            jcr:primaryType="nt:unstructured"
                                            sling:resourceType="granite/ui/components/coral/foundation/container">
                                            <items jcr:primaryType="nt:unstructured">
                                                <emojiPicker
                                                    jcr:primaryType="nt:unstructured"
                                                    sling:resourceType="/apps/eaem-emojis-rte-plugin/emoji-widget"
                                                    fieldDescription="Select Emoji..."
                                                    fieldLabel="Select Emoji..."
                                                    name="./eaemEmoji"/>
                                            </items>
                                        </column>
                                    </items>
                                </fixedColumns>
                            </items>
                        </emoji>
                    </items>
                </form>
            </items>
        </body>
    </jcr:content>
</jcr:root>

3) Create widget /apps/eaem-emojis-rte-plugin/emoji-widget/emoji-widget.jsp to add a div container, search code for the emojis...

<%@ include file="/libs/granite/ui/global.jsp" %>

<ui:includeClientLib categories="lodash" />

<%
    String defaultKeyword = "face";
%>

<div class="coral-Form-fieldwrapper">
    <label class="coral-Form-fieldlabel">Search</label>
    <input is="coral-textfield" class="coral-Form-field" placeholder="<%= defaultKeyword %>"
           id="eaem-emoji-input"
           value="<%= defaultKeyword %>">
</div>

<div class="coral-Form-fieldwrapper" id="eaem-emojis">
</div>

<script>
    (function($){
        var URL = "https://emoji-api.com/emojis?access_key=bcbd6980f7392ceda8914932404927e9b198486e&search=";

        function showEmojis(keyword) {
            $.ajax(URL + keyword).done(handler);

            function handler(data) {
                var $emojis = $("#eaem-emojis"), html = "";

                _.each(data, function (emoji) {
                    html = html + getEmojiHtml(emoji["character"]);
                });

                $emojis.html(html);
            }

            function getEmojiHtml(character) {
                return "<span style='cursor:pointer'>" + character + "</span>";
            }
        }

        function addListener(){
            $("form").on("submit", function(){
                showEmojis($("#eaem-emoji-input").val());
                return false;
            });
        }

        showEmojis("<%=defaultKeyword%>");

        addListener();
    }(jQuery));
</script>

4) Create clientlib (cq:ClientLibraryFolder) /apps/eaem-emojis-rte-plugin/clientlib set property categories to [cq.authoring.dialog.all, eaem.rte.emojis.plugin] and dependencies to [lodash]

5) Create file (nt:file) /apps/eaem-emojis-rte-plugin/clientlib/js.txt, add the following content

                                    eaem-emojis.js

6) Create file (nt:file) /apps/eaem-emojis-rte-plugin/clientlib/eaem-emojis.js, add the following code

(function($, CUI, $document){
    var GROUP = "experience-aem-emojis",
        INSERT_EMOJI_FEATURE = "insertEmoji",
        EAEM_INSERT_EMOJI_DIALOG = "eaemTouchUIInsertEmojiDialog",
        SENDER = "experience-aem", REQUESTER = "requester",
        FONT_SELECTOR_URL = "/apps/eaem-emojis-rte-plugin/emoji-selector.html",
        url = document.location.pathname;

    if( url.indexOf(FONT_SELECTOR_URL) == 0 ){
        handlePicker();
        return;
    }

    function handlePicker(){
        $document.on("click", "#eaem-emojis span", addEmojiSelectListener);
    }

    function addEmojiSelectListener(){
        var message = {
            sender: SENDER,
            action: "submit",
            data: {
                emoji: $(this).html()
            }
        };

        getParent().postMessage(JSON.stringify(message), "*");
    }

    function getParent() {
        if (window.opener) {
            return window.opener;
        }

        return parent;
    }

    addPlugin();

    addPluginToDefaultUISettings();

    addDialogTemplate();

    function addDialogTemplate(){
        var url = Granite.HTTP.externalize(FONT_SELECTOR_URL) + "?" + REQUESTER + "=" + SENDER;

        var html = "<iframe width='700px' height='300px' frameBorder='0' src='" + url + "'></iframe>";

        if(_.isUndefined(CUI.rte.Templates)){
            CUI.rte.Templates = {};
        }

        if(_.isUndefined(CUI.rte.templates)){
            CUI.rte.templates = {};
        }

        CUI.rte.templates['dlg-' + EAEM_INSERT_EMOJI_DIALOG] = CUI.rte.Templates['dlg-' + EAEM_INSERT_EMOJI_DIALOG] = Handlebars.compile(html);
    }

    function addPluginToDefaultUISettings(){
        var groupFeature = GROUP + "#" + INSERT_EMOJI_FEATURE,
            toolbar = CUI.rte.ui.cui.DEFAULT_UI_SETTINGS.dialogFullScreen.toolbar;

        if(toolbar.includes(groupFeature)){
            return;
        }

        toolbar.splice(3, 0, groupFeature);
    }

    var EAEMInsertEmojiDialog = new Class({
        extend: CUI.rte.ui.cui.AbstractDialog,

        toString: "EAEMInsertEmojiDialog",

        initialize: function(config) {
            this.exec = config.execute;
        },

        getDataType: function() {
            return EAEM_INSERT_EMOJI_DIALOG;
        }
    });

    function addPlugin(){
        var EAEMTouchUIInsertEmojiPlugin = new Class({
            toString: "EAEMTouchUIInsertEmojiPlugin",

            extend: CUI.rte.plugins.Plugin,

            pickerUI: null,

            getFeatures: function() {
                return [ INSERT_EMOJI_FEATURE ];
            },

            initializeUI: function(tbGenerator) {
                var plg = CUI.rte.plugins;

                addPluginToDefaultUISettings();

                if (!this.isFeatureEnabled(INSERT_EMOJI_FEATURE)) {
                    return;
                }

                this.pickerUI = tbGenerator.createElement(INSERT_EMOJI_FEATURE, this, false, { title: "Select Emoji..." });
                tbGenerator.addElement(GROUP, plg.Plugin.SORT_FORMAT, this.pickerUI, 10);

                var groupFeature = GROUP + "#" + INSERT_EMOJI_FEATURE;
                tbGenerator.registerIcon(groupFeature, "heart");
            },

            execute: function (pluginCommand, value, envOptions) {
                var context = envOptions.editContext,
                    ek = this.editorKernel;

                if (pluginCommand != INSERT_EMOJI_FEATURE) {
                    return;
                }

                var dialog,dm = ek.getDialogManager(),
                    $container = CUI.rte.UIUtils.getUIContainer($(context.root)),
                    propConfig = {
                        'parameters': {
                            'command': this.pluginId + '#' + INSERT_EMOJI_FEATURE
                        }
                    };

                if(this.eaemInsertEmojiDialog){
                    dialog = this.eaemInsertEmojiDialog;

                    dialog.$dialog.find("iframe").attr("src", this.getPickerIFrameUrl());
                }else{
                    dialog = new EAEMInsertEmojiDialog();

                    dialog.attach(propConfig, $container, this.editorKernel);

                    dialog.$dialog.find("iframe").attr("src", this.getPickerIFrameUrl());

                    this.eaemInsertEmojiDialog = dialog;

                    $(window).off('message', receiveMessage).on('message', receiveMessage);
                }

                dm.show(dialog);

                function receiveMessage(event) {
                    event = event.originalEvent || {};

                    if (_.isEmpty(event.data)) {
                        return;
                    }

                    var message, action;

                    try{
                        message = JSON.parse(event.data);
                    }catch(err){
                        return;
                    }

                    if (!message || message.sender !== SENDER) {
                        return;
                    }

                    action = message.action;

                    if(action === "submit"){
                        ek.relayCmd(pluginCommand, message.data);
                    }

                    dialog.hide();
                }
            },

            getPickerIFrameUrl: function(){
                return Granite.HTTP.externalize(FONT_SELECTOR_URL) + "?" + REQUESTER + "=" + SENDER;
            },

            updateState: function(selDef) {
                var hasUC = this.editorKernel.queryState(INSERT_EMOJI_FEATURE, selDef);

                if (this.pickerUI != null) {
                    this.pickerUI.setSelected(hasUC);
                }
            }
        });

        var EAEMTouchUIEmojiCmd = new Class({
            toString: "EAEMTouchUIEmojiCmd",

            extend: CUI.rte.commands.Command,

            isCommand: function (cmdStr) {
                return (cmdStr.toLowerCase() == INSERT_EMOJI_FEATURE);
            },

            getProcessingOptions: function () {
                var cmd = CUI.rte.commands.Command;
                return cmd.PO_SELECTION | cmd.PO_BOOKMARK | cmd.PO_NODELIST;
            },

            execute: function (execDef) {
                var emoji = execDef.value.emoji, context = execDef.editContext,
                    emojiSpan = context.doc.createElement("span");

                emojiSpan.innerHTML = emoji;

                var range = CUI.rte.Common.ua.isIE ? CUI.rte.Selection.saveNativeSelection(context)
                                        : CUI.rte.Selection.getLeadRange(context);

                range.insertNode(emojiSpan);
            },

            queryState: function(selectionDef, cmd) {
                return false;
            }
        });

        CUI.rte.commands.CommandRegistry.register(INSERT_EMOJI_FEATURE, EAEMTouchUIEmojiCmd);

        CUI.rte.plugins.PluginRegistry.register(GROUP,EAEMTouchUIInsertEmojiPlugin);
    }
}(jQuery, window.CUI,jQuery(document)));

AEM Cloud Service - Tailing AEM Environment Logs in a Cloud Manager Program


For debugging any issue in AEM the ideal way is to setup a JVM remote debugger, however if that is not an option you could try log tailing....

Following steps explain the setup and tailing an environment log in a cloud manager program using Cloud Manager Plugin for the Adobe I/O CLI. Check it on Github

Tailing logs is also available in an open source implementation of Cloud Manager Desktop


Install the Adobe IO Node.js Application


1) Open command prompt and install Adobe I/O CLI. More details on Adobe IO CLI here

npm install -g @adobe/aio-cli

2) Install the Cloud Manager Plugin. More details on the CM plugin here

aio plugins:install @adobe/aio-cli-plugin-cloudmanager


Setup Service Account Connection (using JWT)


3) Accessing any Adobe product API (here Cloud Manger in Experience Cloud) is achieved using a service account creation in Adobe IO (https://console.adobe.io/). Assuming you have System Administrator or Developer role in the Org (eg. ORG ID: 2FBC7_PURPOSEFUL_OBFUSCATION_95FBB@AdobeOrg) create a project and click on the Add API button (for more details on service accounts integration check documentation)


4) Select Cloud Manager under Experience Cloud


5) Generate a Key pair (private, public key) to exchange access tokens...


6) Public key remains with Adobe IO and the Private key is configured in your application (here Adobe IO command line application)


7) Select the product profiles (features) of Cloud Manager you'd like to use in the CLI application. Your integration's service account will gain access to granular features of the Adobe product based on the product profiles that you select.


8) Make note of the Credentials (for using later in the configuration), click on Generate JWT tab to copy the JWT payload


9) Create a file config.json, copy the client_id, client_secret, jwt_payload values to the config file, for e.g.

{
  "client_id": "bef8a_PURPOSEFUL_OBFUSCATION_2ea5",
  "client_secret": "fdcc_PURPOSEFUL_OBFUSCATION_e46d4",
  "jwt_payload": {"exp":1589039706,"iss":"2FB_PURPOSEFUL_OBFUSCATION_5FBB@AdobeOrg","sub":"6BC_PURPOSEFUL_OBFUSCATION_FA7@techacct.adobe.com","https://ims-na1.adobelogin.com/s/ent_cloudmgr_sdk":true,"aud":"https://ims-na1.adobelogin.com/c/be_PURPOSEFUL_OBFUSCATION_ea5"},
  "token_exchange_url": "https://ims-na1.adobelogin.com/ims/exchange/jwt"
}


Configure Adobe IO CLI


10) Open command prompt and set the config file in Adobe IO app, for eg.

aio config:set jwt-auth ./config.json --file --json


11) Set the private key downloaded in step 6, for eg.

aio config:set jwt-auth.jwt_private_key ./private.key --file


12) Set the cloud manager program id, if you want to avoid passing the program ID flag repeatedly (something like a default program) for eg.

aio config:set cloudmanager_programid 10961


13) Get the services names in an environment of the program, for e.g.

aio cloudmanager:list-available-log-options 19892


14) To tail the error log use aio cloudmanager:tail-log ENVIRONMENTID SERVICE NAME, for e.g.

aio cloudmanager:tail-log 19892 author aemerror
aio cloudmanager:tail-log 19892 dispatcher aemdispatcher


AEM 6540 - Creating Dynamic Media Classic (Scene7) Templates for Image Text Overlays


The following steps explain creating a Scene7 Template using layered PSD file for adding text overlays on images. Image Server (IPS) can deliver these images using presets with text and image passed as parameters in URL. 

More about templates in documentation


Create PS Document

1) Open Photoshop, Click File > New, enter Width & Height of image (e.g. 450 x 450), select Transparent background, click Create...


2) Add a template image on the transparent background. You can open the image ( File > Open ) adjust size to 450 X 450 and copy it to the psd layer created in step 1...


3) Add a Rectangle on the Image (about 20% from the top), fill with gray background and set the opacity to say 75%. This section on the image is for text overlay...


4) Rename the layers so the generated assets from PSD layers in Scene7 have some meaningful asset names. Download the sample psd here


Create Scene7 Template

5) Login to Scene7 SPS - https://s7sps1.scene7.com/IpsWeb/, select the folder in left pane and click Upload... 


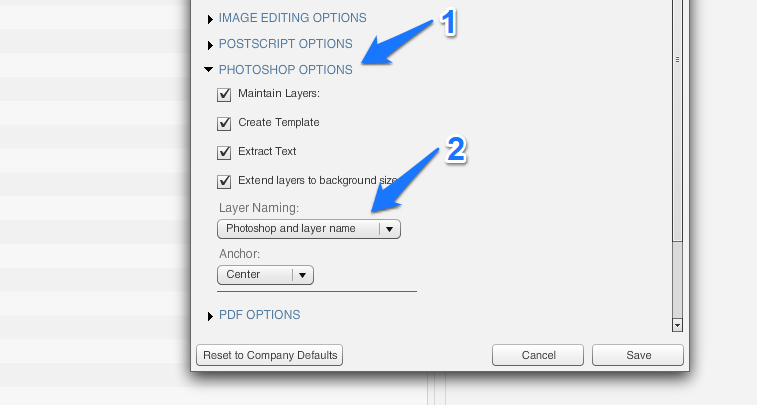
6) Select the PSD created above by clinking Browse; In the bottom right corner of upload window, click Job Options to configure the layer extract (and generate assets) specific settings...


7) When the PSD upload job processing is complete in Scene7, you should see the generated assets from extracted layers... (if you donot see generated content, click Setup > General Settings > Show Generated Content)


8) Click Edit on the Template card (this template was created from PS doc uploaded). Edit it to add heading & subtext overlays and parameterize the template....


9) Drag the Text tool onto image, using the RTF editor add some text e.g. HEADING, format it with font, size etc. 


10) Similarly add the subtext...


11) Before parameterizing the template, check if Preview looks ok (image with heading and subtext overlay)


Create Scene7 Template Parameters

12) Lets parameterize the image, heading and subtext of the template for creating dynamic images with text overlays (pass the image name, heading and subtext as parameters to image url). For adding Image parameter, click on P button


13) For parameterizing the heading text, click on the P button next to it, click on the Text tab in resulting window, select the text and click add to configure the url parameter


14) Similarly parameterize the subtext


15) Click Preview, to experiment with the parameters, change text, image etc... copy url and open in new browser tab, check the image rendered....


16) Create a custom preset EAEM, for 450 x 450 sizing and 100% quality....


17) Image delivery using custom preset EAEM